Aim: make a web interface for controlling cheap remote control vehicles.
The first stage is complete, the rc car can be controlled from a serial terminal.
Will post a proper write-up with photos, schematics and details later on this evening when Kal comes over to interface it with his wiimote/bluetooth setup.
Well, I clearly failed to write this up in time.. I cannot do this now as I am back at uni studying for my finals. To cut a long story short I used 4 MOSFETS instead of relays to allow the arduino to switch current through the contacts of a remote control unit for an r/c car. This is due to the low switching current is this case...However, the wiring and programming is relatively simple so perhaps I can quickly explain it?
Arduino outputs (13,12,11,10) are set to digital out. These are set high or low. This applies a voltage, or not, to the gate (middle pin) of each of 4 MOSFETs. The MOSFETs are wired to source their current from the high voltage rail (each of 4 switch contacts) on the remote control unit (with silk screen labels: SW4, SW3, SW2, SW1 respectively). The MOSFETs sink the current to battery GND. The GND on the remote control unit (is also the metal prongs) must also be connected to the transistor ground. You will have to work out the rest until I can do a full writeup with diagrams and photos.
I will upload a really bad video of the initial testing just for kicks...
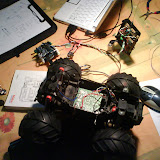
Here are the photos:
Well, I clearly failed to write this up in time.. I cannot do this now as I am back at uni studying for my finals. To cut a long story short I used 4 MOSFETS instead of relays to allow the arduino to switch current through the contacts of a remote control unit for an r/c car. This is due to the low switching current is this case...However, the wiring and programming is relatively simple so perhaps I can quickly explain it?
Arduino outputs (13,12,11,10) are set to digital out. These are set high or low. This applies a voltage, or not, to the gate (middle pin) of each of 4 MOSFETs. The MOSFETs are wired to source their current from the high voltage rail (each of 4 switch contacts) on the remote control unit (with silk screen labels: SW4, SW3, SW2, SW1 respectively). The MOSFETs sink the current to battery GND. The GND on the remote control unit (is also the metal prongs) must also be connected to the transistor ground. You will have to work out the rest until I can do a full writeup with diagrams and photos.
I will upload a really bad video of the initial testing just for kicks...
Here are the photos:
 |
| #1-WebInterfaceForRemoteControlledVehicles |